The Home Coffee Roasting Toolkit: a starters guide for 2024
The must-have home coffee roasting equipment for beginners. From roasters to cooling trays, here are the essentials to start roasting coffee.

67% of Americans had at least one cup of coffee in the past day, and (it’s up to 75% if you consider within the past week). Yet, there’s no doubt that many of those cups of coffee were made with old and weak beans that had been roasted and ground long before it was brewed for the cup. That's why coffee enthusiasts are taking matters into their own hands – and into their own roasters.
I started roasting back in 2020 when I moved to Iowa. For years, I had haunted coffee shops and small roasters wherever I lived, but there were none to find near me at the height of pandemic lockdowns in rural Iowa. Each morning, I drank coffee from beans I bought at my local Hy-Vee or the one coffee shop in town, and I was always disappointed with what I was sure was old, overpriced coffee. Then I started to roast for myself and a new world opened up for me.
Today, we're diving into the world of home coffee roasting equipment. Trust me, once you've tasted freshly roasted coffee from your very own roast, there's no going back.
What We Mean When We Say We’re Roasting Coffee
So, coffee roasting isn’t just heating up the coffee beans until they change colors like a loaf of bread. Green coffee beans (which are actually seeds) are seriously tough. (Try hammering a fresh one. But whatever you do, never ever try to grind a fresh green coffee bean; you’ll destroy your grinder.) We need to roast the beans to make the beans brittle enough (by making them porous at a microscopic level) and to grind and allow some of the bean to break apart in hot water to make our cup of coffee.
The second thing that happens is that roasting the beans changes the beans chemically in order to unlock the flavors (the volatile organic compounds) we’re seeking. (An unroasted green bean tastes more grassy than anything else). This process is influenced by the temperature, how that temperature is applied to the bean, the duration of the rising heat (more on that below) and how fast the beans are cooled.
The best thing about home roasting is how much you can customize your coffee by controlling the heat and the duration. Want a light, nutty roast? No problem. Prefer dark French or Italian roasts? Roast those beans until they’re nearly black and sweaty with oil. You’re the conjurer, and hopefully, the coffee can be your magic. Plus, the first time you see and taste the difference in the grounds when you roast, you’ll realize how much stale coffee you’ve had in the past. Plus, you’ll actually save some serious dough in the long run because buying good roasted beans ain't cheap.
Now, when it comes to roasting methods, you've basically got two main players: air roasting and drum roasting. Air roasters are like the hyperactive kids of the coffee world - they're fast and pretty easy to use. (This is what I currently use).
Drum roasters, on the other hand, are more like the slow and steady tortoise. They take a bit longer, but some folks swear they give a more even roast. (I intend to get a drum roaster in the future).
Now, yes, there are also other methods: roasting in a skillet or baking. These methods used to be really common in the past, but I really don’t recommend them because of a simple principle of roasting coffee: you’re not looking to roast the coffee at a consistent temperature. If you do this, what happens is that it’ll cut the flavor down into something a bit more grassy or flat. The richness of flavor (and the varieties of them) is only unlocked from the beans when we roast with a constantly rising temperature throughout the roasting time. Also, in baking and or stirring on a skillet, it’s unlikely you’ll be able to get the beans to roast evenly.
Like anything, roasting at home can be a bit overwhelming at first. And yes, you'll probably mess up a few batches. But trust me, when you sip that first cup of coffee made from beans you roasted yourself? You begin to appreciate how good coffee can get.
Also, one last tip: no matter how you start roasting your coffee, always roast it in a very well-ventilated space, preferably outside. Otherwise, you’re smoke alarm will go off: seriously.
Essential Home Coffee Roasting Equipment
There’s a lot of gear, and it was hard to figure out what the differences were and why it mattered when I first dipped my toes into home roasting. Like a lot of things, you can always spend more money on ever more fancy equipment. But trust me, you don't need to break the bank to get started.
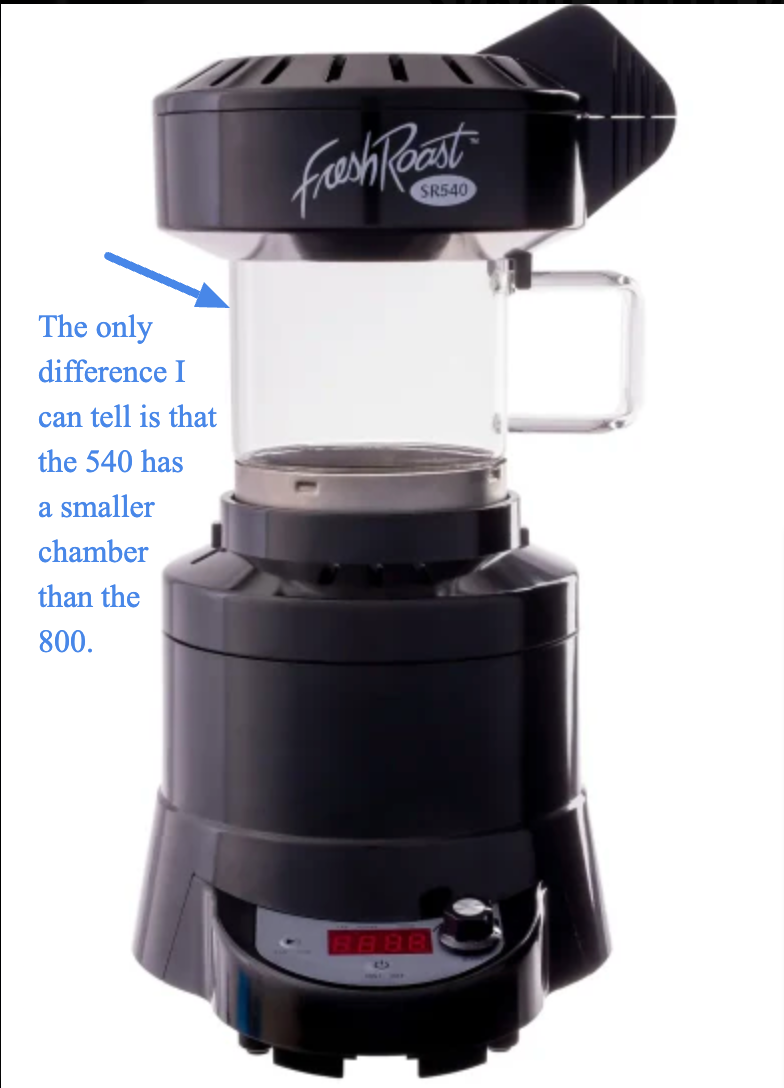
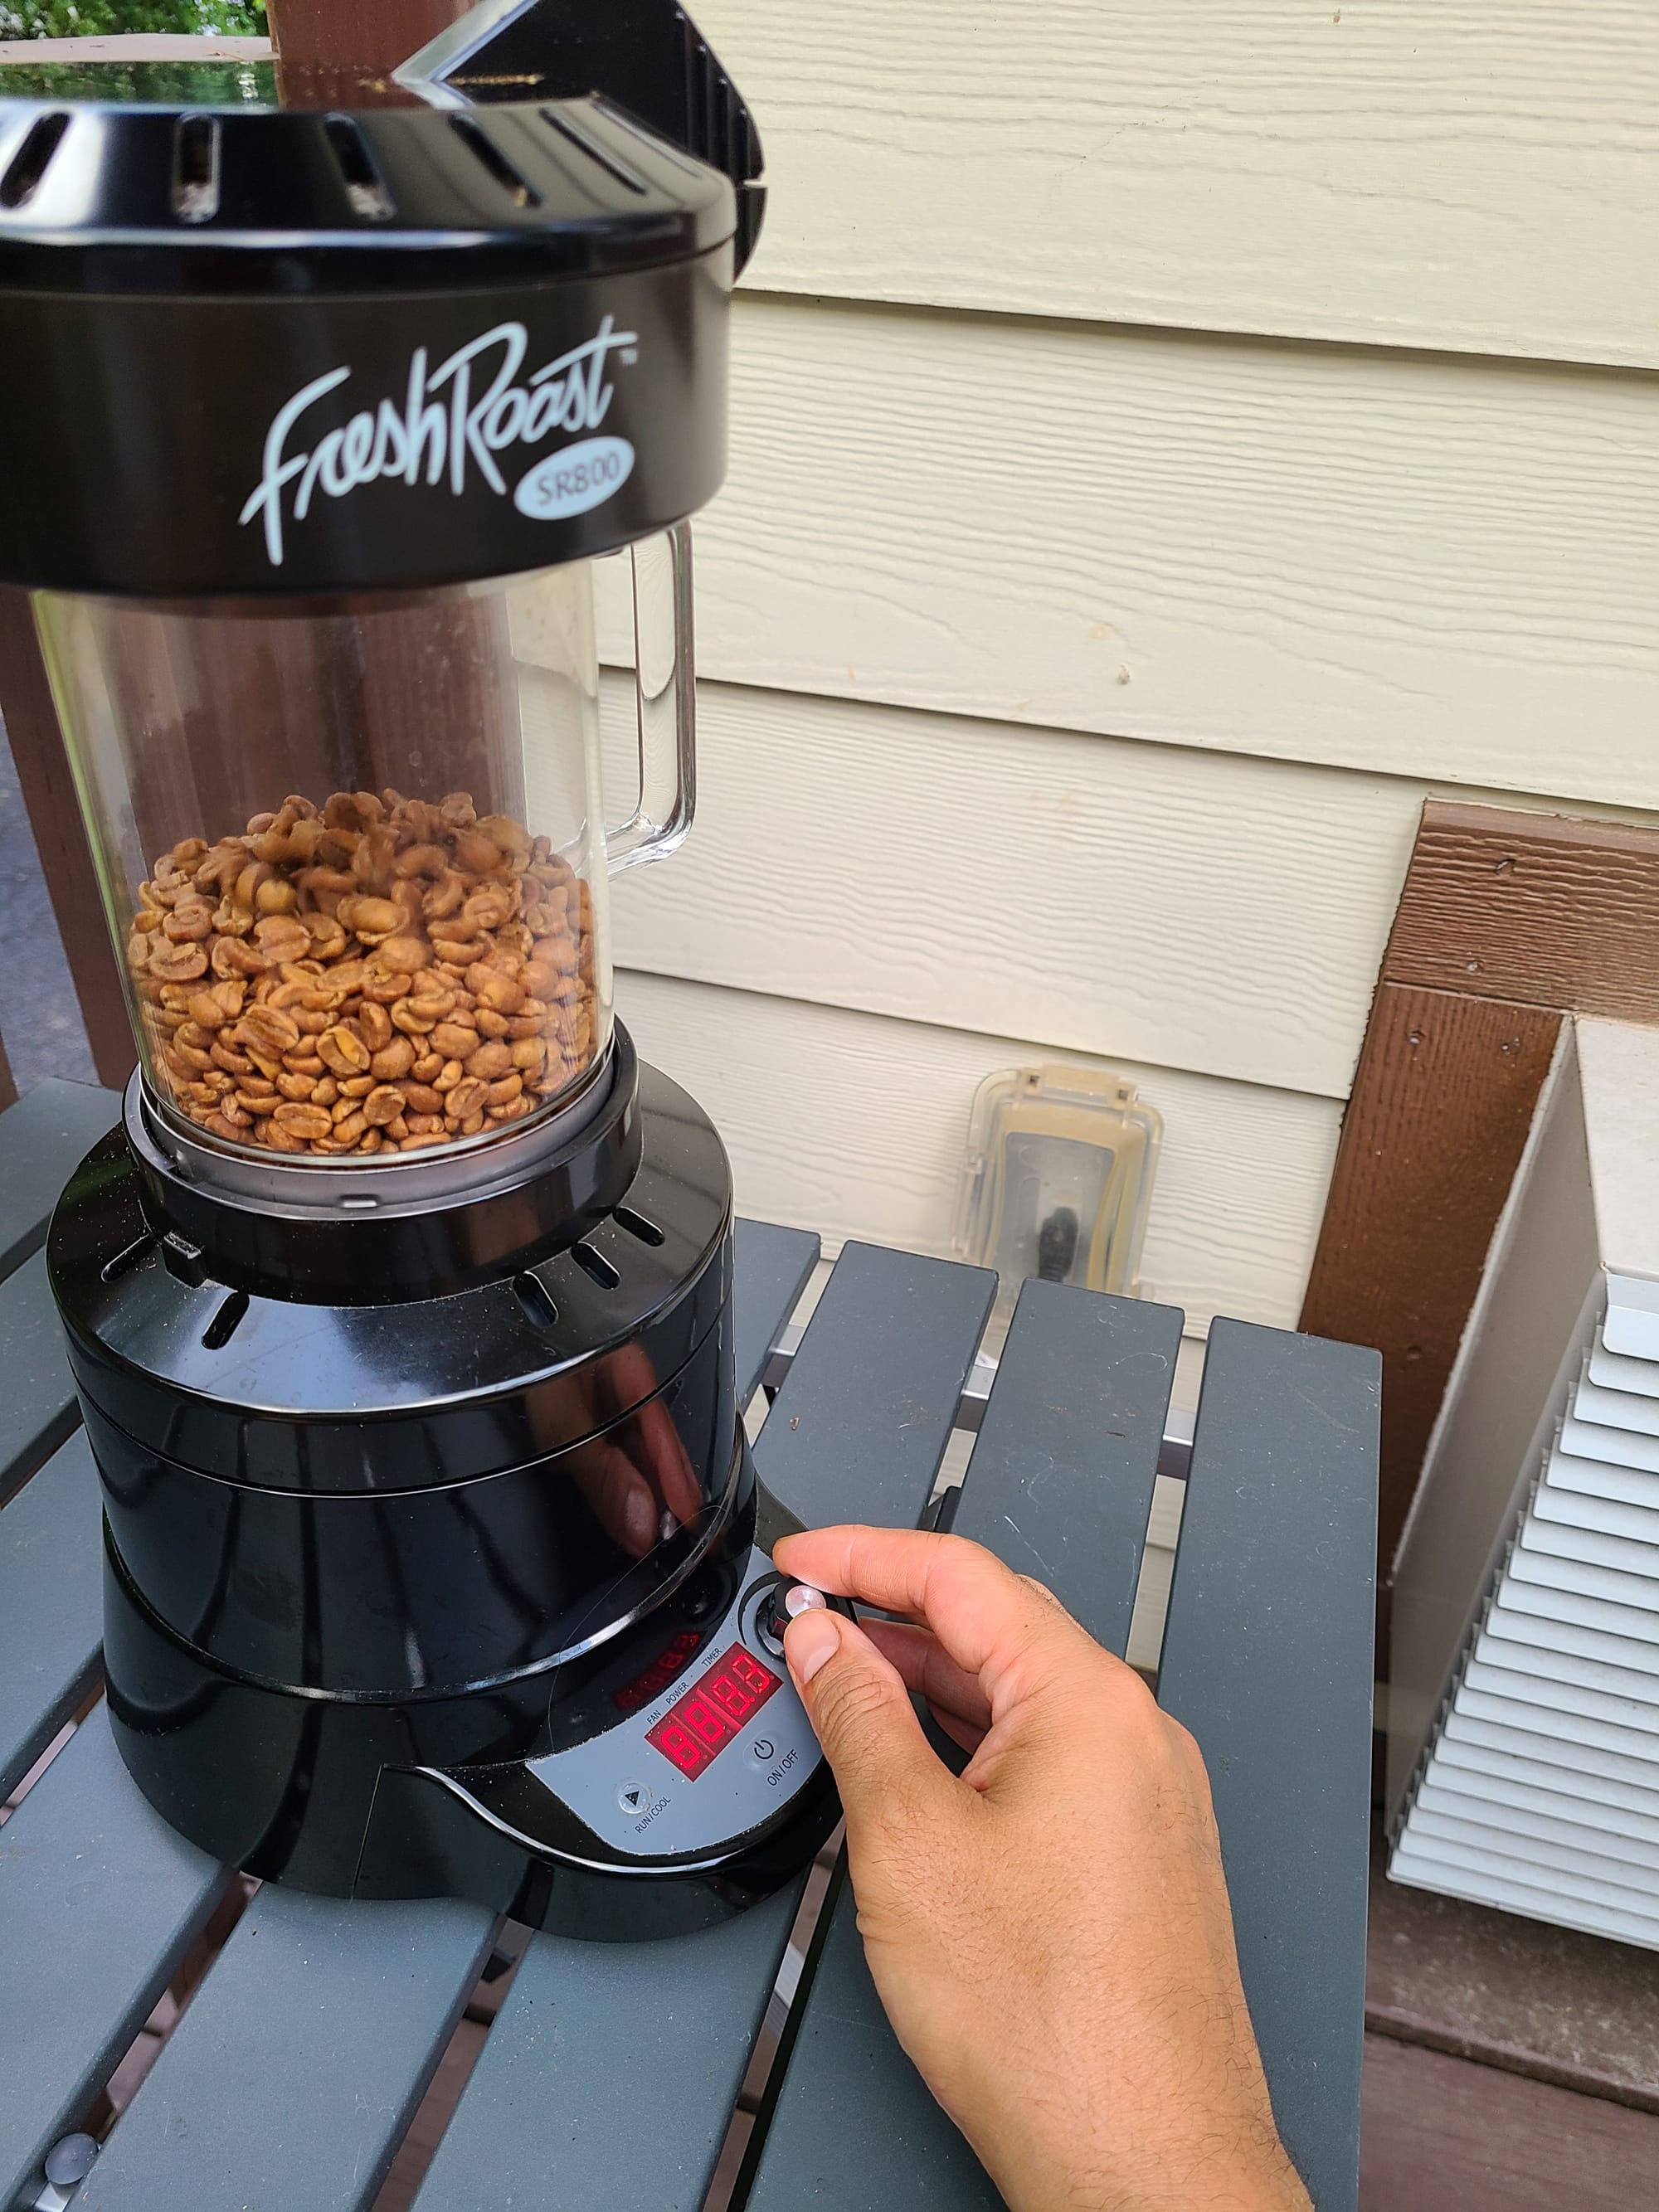
First up, the star of the show: your roaster. There are two main types - air roasters and drum roasters. I use an air roaster, the Fresh Roast SR800. But the more budget-friendly and perfect for newbies is the Fresh Roast SR-540, which you can get for a little over 200 dollars. That ain't too shabby, considering how much you'll save on good coffee in the long run.
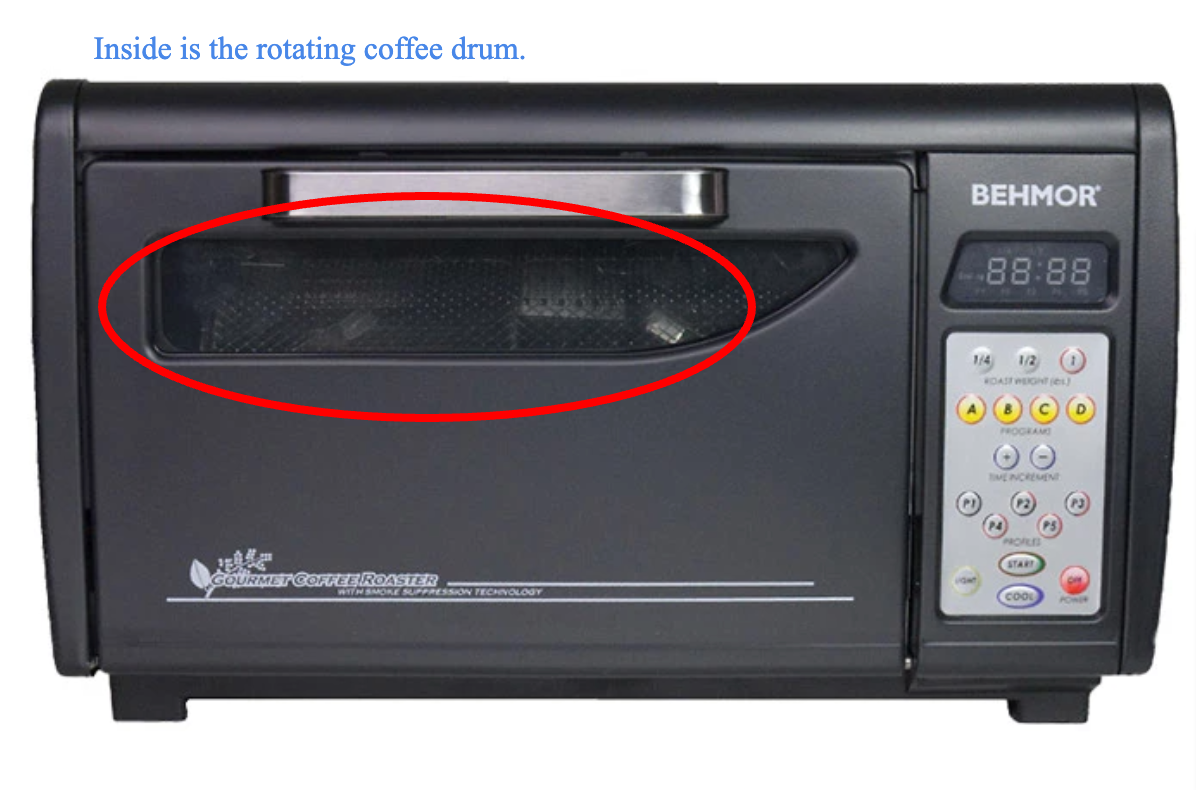
Now, if you're feeling a bit more adventurous and ready to dive into drum roasting, check out the Gene Cafe CBR-101 Half Pound Roaster. It uses a ‘vortex’ twisting to mix and ensure the roast is consistent. It is simply an amazing roaster with a great reputation. It does come in around 650 dollars, which is pricer than the Fresh Roast air roasters. A more affordable drum roaster is the Behmor 2000AB Plus, which is under 500 bucks and has some really good reviews as well.
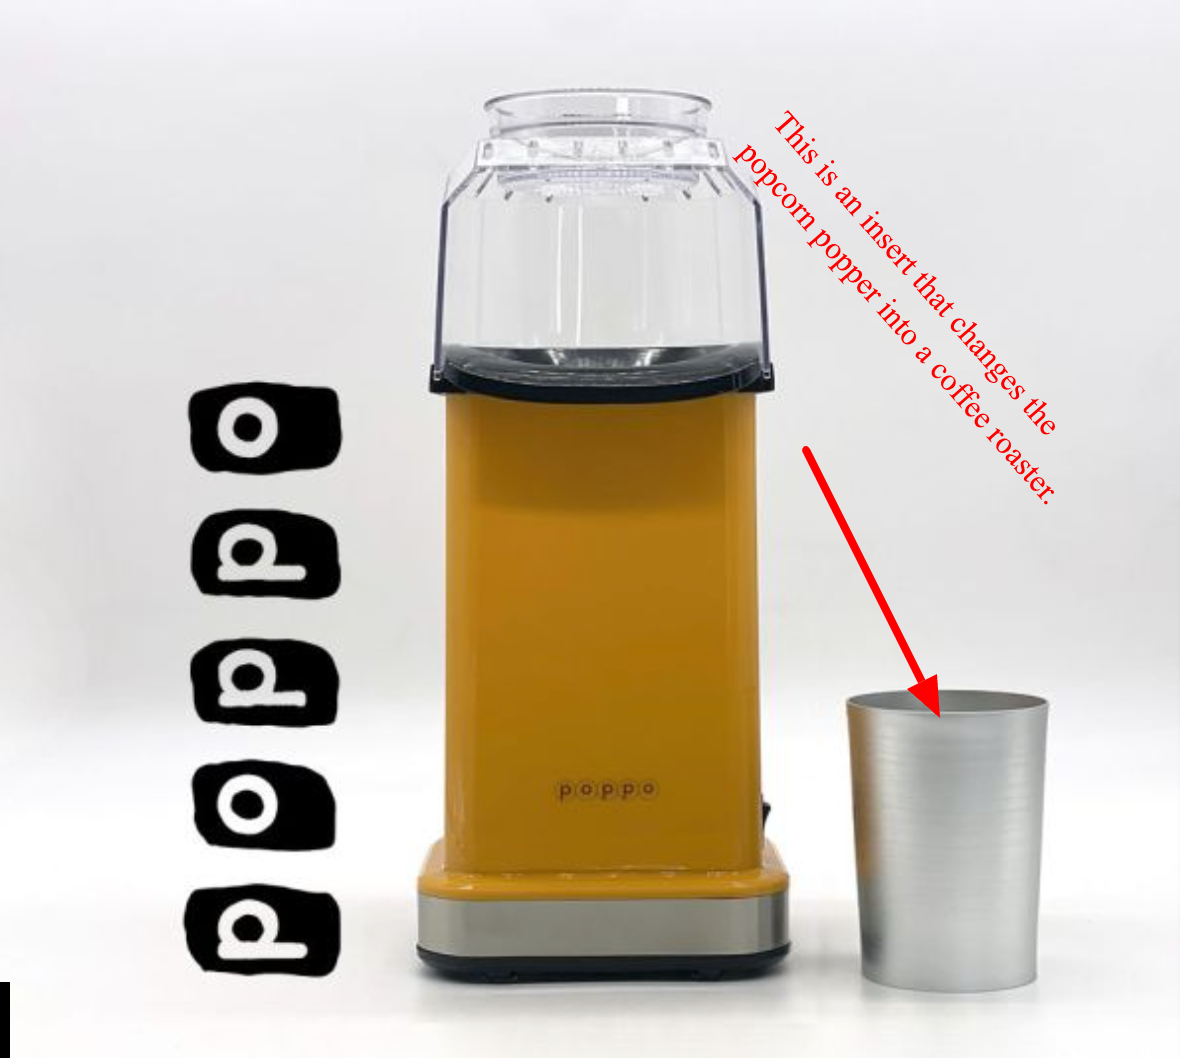
If you’re feeling a bit broke, check out the Sweet Maria’s Poppo air popcorn kit. It’s thirty bucks and forces hot air, and has a special insert to help catch the separating chaff from the roasting process.
If you’re a bit nostalgic for how people used to roast in the past you can roast by hand on the stove with this Nuvo Eco Ceramic Handy Coffee Bean Roaster, basically a ceramic pot you use over a gas stove. Or you can start off the way I did which was with the Cafe Masey Home Coffee Bean Roaster Machine. (This isn’t the exact same one as what I had, but this one has a nifty coffee bean shaped handle). 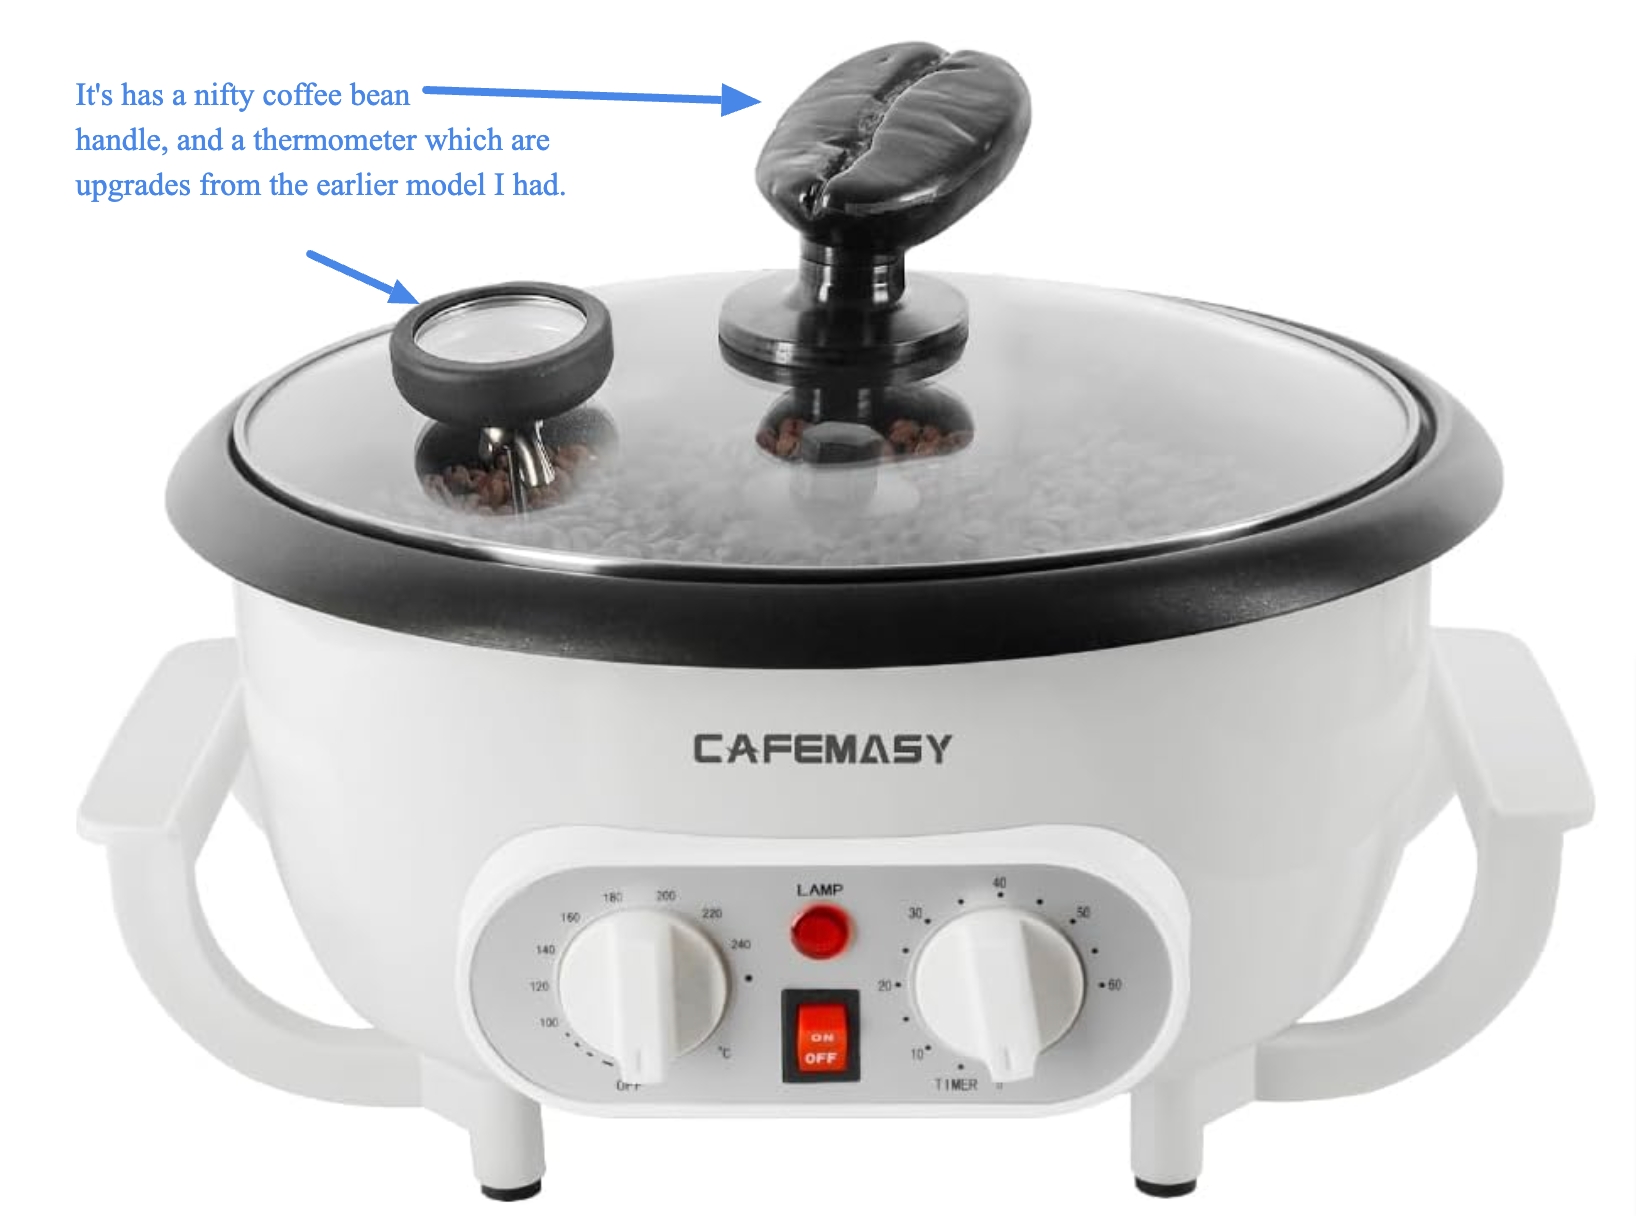
Again, the issue with these super budget options is that your ability to control the timing and the consistently rising temperature during your roast is limited or non-existent. With that said, I still got better roasts from my Cafe Masey than what I could buy.
But a roaster alone won't cut it. You need some green coffee beans to roast! There are quiet a few places that sell green coffee beans, but I’ve always had great experiences with Coffee Bean Corral. Another popular place is Sweet Marias. Both have got a great selection and the quality is top-notch.
Oh, and don't forget about cooling your beans after roasting: this is assuming you didn’t buy an air roaster or drum roaster that automatically cools the beans for you. If you aren’t quick about cooling the beans, then they’ll keep roasting with their internal temperatures and turn bitter. (I know, and learned this the hard way). A simple colander works fine, or you can use a pair of strainer baskets and drop the beans from one to the other a few times which works great to cool and clear out any remaining chaff.
If your roaster doesn't have a built-in thermometer (like my old roaster didn't), you'll want to grab one. It's not absolutely necessary, but it'll help you nail those consistent roasts. You can pick up a cheap infrared thermometer from Amazon.
Lastly, you gotta store those freshly roasted beans properly. Don't be like me and leave 'em in an open bag - they'll go stale faster than you can say "coffee." Invest in some coffee bags or some fancy coffee canisters with CO2 release valves, like any of these. (They will off-gas for a while).
Remember, you don't need all this stuff right away. Start small, learn the ropes, and upgrade as you go. Before you know it, you'll be roasting coffee like a pro - and probably annoying all your friends with your newfound coffee snobbery. But hey, that's half the fun, right?
Useful Tools to Make Your Home Coffee Roasting Life Easier
So you got your roaster and your beans. Next, there are some extra gadgets that'll make your home-roasting life much easier.
First up, a digital scale. You can eyeball your beans like some coffee cowboy and guestimate, but that’s a big mistake. Most roasters can’t do their job if they’re overloaded or have too little. Buy a cheap digital scale so that one factor stays consistent: the amount you roast each time. (Also, just about any roaster that you would buy, will have a suggested amount for you to roast with each batch).
Next, there are roasting logs. It’s something that you use to keep track of what happened during your roast. You fill out information like the roasting time, amount roasted, temperature, etc. There are apps like Artisan, Roast Buddy, and Coffee Roaster. But really, a pencil and paper log notebook like these work, or even printing off your own sheets using this helpful template. The key is to figure out what you did, and consider ways to improve (or make sure you can repeat the same good roast again).
Oh, if the roaster you end up buying has an accessory for chaff collecting, get it. Cleaning up those papery little bean skins was a real pain in the ass. They get everywhere! (This is another reason I recommend roasting outside since you can just blow it into the yard, or sweep it up into a dustbin).
Now, heat-resistant gloves might sound like overkill, but hear me out. I once tried to grab my roasting chamber bare-handed. Yes, it was stupid, and I got burned. I was roasting outside on a winter night, and thought that because it was so cold outside, the glass wouldn’t be so hot. Not my brightest moment. Do yourself a favor, protect those mitts!
Remember, none of this stuff is absolutely necessary. But if you're looking to make life a little easier, these tools make that happen.
Setting Up Your Home Coffee Roasting Space
Okay, let's talk about setting up your coffee roasting HQ.
First things first: ventilation. The first time I roasted, it was in the apartment kitchen. I thought, "How bad could it be?" The smoke hazed the air for an hour, and the apartment smelled of singed coffee for a week. (and that was with airing the apartment out for hours at a time. My smoke alarm screamed, causing my one-year-old to scream, and life felt pretty miserable. The next time I roasted in the garage with its windows and the garage door open, the smell of coffee smoke drifted up the vents and hung in the air of the apartment for hours.
So, take it from me: pick a spot with excellent airflow. I now roast outside, on a camping table on the deck; it’s the best way to do it. If you’ve ever gone by larger operations, you’ll notice that they have heavy-duty ventilation units drawing all the roasting smoke outside, and you can smell it from a half mile away. Seriously, ventilation is no joke.
If you absolutely have to roast inside, have a small fan drawing air from the window and fans blowing toward that window with all the windows open. It's not perfect, but it beats having your whole house smell like burnt popcorn for days. If you're roasting in a garage, you’ll still need fans going, trust me.
Now, let's talk safety: you're basically running a mini fire pit when you roast coffee. It pays to be careful. Keep a fire extinguisher nearby. I've never had to use mine but you’ll hear about how someone tosses some hot chaff into a dustbin and start a fire.
And those smoke alarms? If you’re roasting inside and not ventilating well enough, you’ll find out if they’re working.
As for organizing your equipment, think of it like setting up a little coffee-roasting assembly line. I keep my green beans on one side, my roaster in the middle, and my cooling colanders and storage containers on the other side. It's not rocket science, but it makes the whole process smoother than a well-pulled espresso.
Oh, and here's a pro tip: put down a tarp before you start. Chaff gets everywhere, and it's a pain to clean up. (another reason to roast outside since you can just let the cooled chaff blow off onto the lawn).
Remember, your roasting space doesn't have to be fancy, just safe, efficient, and won't drive your family crazy with smoke.
Getting Started: Your First Home Coffee Roast
So, here's the deal: read the instructions that came with your roaster. Seriously. It will give you the parameters of how much green coffee to measure out for your roast. For my Fresh Roast SR800, I started out by following the instructional videos that you can watch here.
Follow the directions for how much green coffee to load the roaster with. Don't get ambitious and think that you can roast more coffee quicker if you do a larger-than-recommended roast: roasters don’t work that way. When they have too many beans to roast, it just won’t work right: the beans won’t roast evenly, or thoroughly, etc.
Next, fire up that roaster. If you're using an air roaster like I do, you’ll load the chamber and then start the roaster. You'll hear it start to sound like a mini jet engine. That's normal! Follow the directions and remember that the temperature should continue to rise throughout the whole roast. It’s better to start raising the temperature slower than faster. (Generally I aim to get the beans to 380F and then slow the rising temperature. I found that when you get above 420F, you’re quickly going to be getting French or Italian dark roasts, which is not my jam).
You’ll know you’re doing it right when you see the beans turn from green to yellow, then to light brown. This is where it gets exciting! Around the time they turn brown, you’ll likely hear what sounds like popcorn popping. That's called the "first crack," music to a coffee roaster's ears.
Keep a close eye on the color. I got distracted once and ended up with beans that looked like little lumps of sweaty coal. Not tasty. For a medium roast, you're looking at about 10-12 minutes total. But every roaster's different, so you need to experiment. (There are lots of variables, like the ambient temperature and humidity, etc. The best way to start is to follow your roaster’s instructions and log everything down).
Once you've hit your desired roast level, dump those beans into your cooling colanders and from a height, let them drop from one to the other slowly through the air to cool quickly. (This is if the roaster doesn’t cool automatically). And for the love of coffee, don't forget this step!
Now, here's the tough part - waiting. Let those beans rest for at least 12 hours before grinding. I know, I know, the temptation to brew immediately is real. But trust me, it’ll taste better; good things come to those who wait.
As for consistency, keep a log of your roasts. Write down everything - time, temperature, what you had for breakfast, everything! It might seem like overkill, but it'll help you replicate that perfect roast.
And mistakes? Oh boy, where do I start? Don't roast indoors without ventilation (unless you enjoy setting off smoke alarms). And don't try to roast coffee in your regular kitchen oven for all the obvious reasons; plus, the smell and taste of coffee will haunt everything baked in that oven for a long time to come.
Remember, your first roast probably won't be perfect. Mine sure wasn't! But stick with it, learn from your mistakes, and before you know it, you'll be sipping on the best damn coffee you've ever had, that you made yourself!
Maintaining Your Home Coffee Roasting Equipment
Maintaining your coffee roaster isn't rocket science, but it's crucial, and simple: follow the instructions included with your roaster. Remember, you’re using a mini fire pit, and if you want the best tasting roasts, you got to keep your tools clean.
Usually, for cleaning, you’ll wipe down air roasters with a dry cloth after each use, and wash the glass chambers every few times. Drum roasters need a bit more TLC - brush out the drum after each use and do a deeper clean monthly.
Replace parts when your roasts taste off, things crack or your machine sounds wonky. I’ve had to replace the glass chamber and the chaff basket on my roaster.
For troubleshooting, check your batch size if roasts are uneven. I once overloaded mine and got a weird mix of burnt and raw beans. Not fun.
If there's too much smoke, try smaller batches or a lighter roast.
Remember, your roaster's your coffee partner. Treat it right, and it'll keep you happily caffeinated. Just don't name it demon slayer or talk to about hellish shit from work. Apparently, that's "weird." At least, that’s what my neighbors told me.
The journey of a thousand sips begins with a single roast. Don't be afraid to experiment, take notes, and most importantly, enjoy the process. With your new home coffee roasting toolkit, you're not just making coffee – you're crafting it, one bean at a time. So, what are you waiting for? It's time to fire up that roaster and fill your home with the intoxicating scent of freshly roasted coffee. Happy roasting!